On this article Goattracker has been introduced and a very simple song has been created. Now we are going to refine that song by improving sounds and by adding more tracks.
When I create Goattracker songs, I use 2x speed mode. When you start Goattracker for the first time, it is in 1x mode. The following picture shows where current speed mode can be seen.

The speed mode can be thought as the speed some parameters are changed. I use 2x mode because it makes it easier to create mixed sounds. It also makes it possible to refine sounds better than 1x mode.
In order to switch Goattracker to 2x mode, you have to click on the “x” in the “1x” label: the 1 will change in 2, like in the picture above. Please notice that the HR/Gate Timer is set to 02. This is not right for a 2x song. For that reason, you have to close Goattracker, than start it again. This way, from now on the HR/Gate timer will be now automatically set to 04 for all instruments. And of course, Goattracker will always start in 2x mode.
At the moment, let’s forget about what a HR/Gate Timer is.
You may need to go back to 1x mode. For instance, the examples that come with Goattracker are 1x songs. To do that, click on the “2” in the “2x” label, and the 2 will turn into a 1. Then, you may close and re-open Goattracker, or you may load the 1x song you want to listen. If you click on the number before the x, or on the x more times, you will be able to decrease/increase the speed mode.
If you load a song and it sounds weird, most of the time the speed mode is set in a wrong way. Just try to change it.
The speed mode is how fast sound parameters are fetched. A 2x mode requires more computing power to play a song than 1x mode. This is rather different than song speed: a 2x song may be slower than a 1x song for instance. A 2x song will usually offer better sounds. In order to fine shape a sound, it is useful to quickly change sound parameters while a sound is being played. 2x mode allows to do these changes more quickly than 1x mode. We will see this in a moment.
To follow this article, please be sure that 2x mode is properly set (2x on the screen and HR/Timer set to 04 for instruments).
Now, we are going to improve this song. It is the one of the previous Goattracker article.
To follow this article, you can use these files. This is the improved song in its different revisions. Extract the files with WinRAR, then you can load them on Goattracker. Each file will be discussed in order.
Load the file “example01_r01.sng”.
This is the first revision of the song. As you can see and you may ear, it sounds a lot different from the original version. Sounds are improved and some musical notes have been changed.
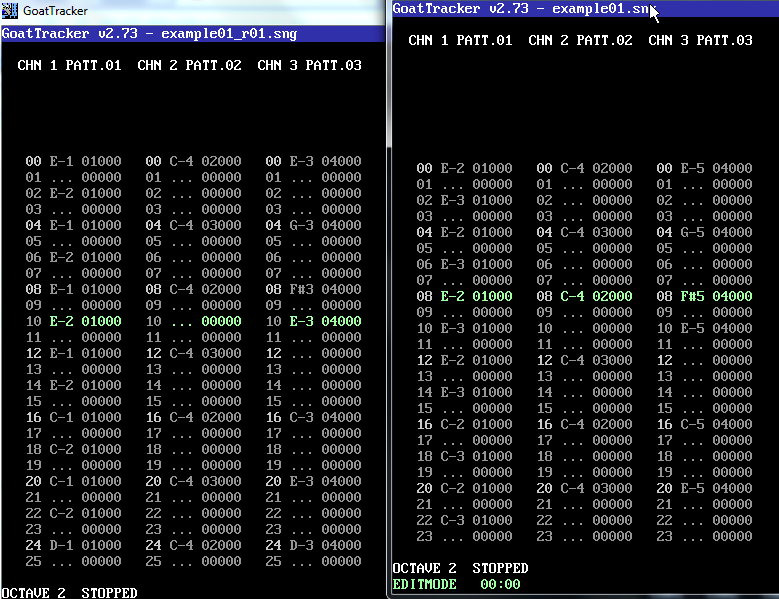
As you can see from the above picture, the bass line on track 1 has been tuned down by one octave. So, E2 is now E1, E3 is E2 and so on. Likewise, track 3, the one with the main melody, has been tuned down by two octaves.
To do these octave shifts, there is no need to write all the notes again. Just go with the cursor on the track to shift, and press SHIFT + S to tune down all the notes by one octave. Press is again to tune down by one more octave.
If you want to tune up by one octave, use the keys SHIFT+W instead. Press those keys repeatedly in order to shift by one or more octaves. You can do some experiments if you like too and adjust the tune to your taste.
I also did some changes in the sounds. Basses are now made with square wave. The flute has been replaced with a square wave lead sound. Drums are also neatly improved.
You may load the original song and do these modifications by yourself if you like to (octaves, sounds) and you can use the files with song revisions for double check. This way, you should learn better. You can also open another Goattracker window if you find it convenient. This way, you can work on the original file to modify it, and check your work with the various modified files already provided.
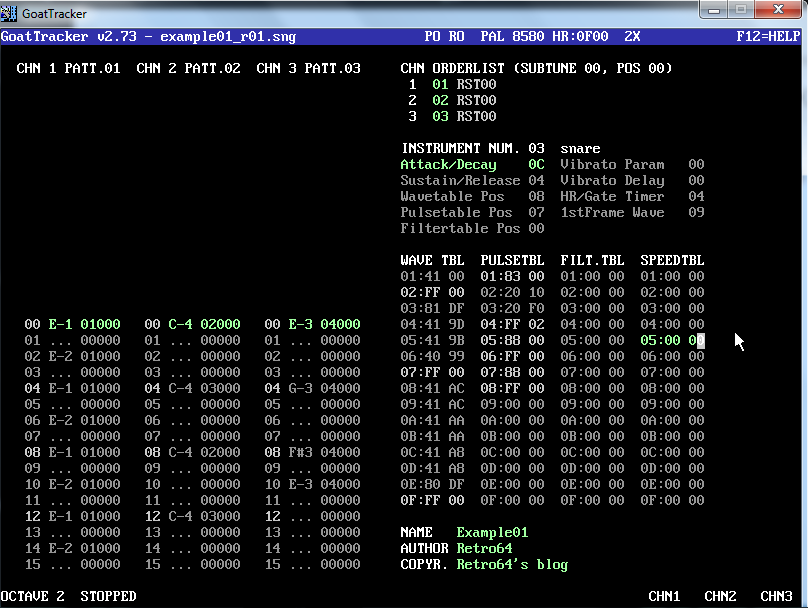
To change the bass sound, go to the instrument editor and select the bass. Now, go on the Wavetable pos entry, put the cursor on the “01” parameter and press enter. Now, you are on the wavetable. Replace value “21” with “41”, which stands for the squarewave.

Before you can properly ear the sound, you also have to set the pulse width, also known as duty cycle. The square wave is actually a rectangular wave. The width of this rectangle changes according to the pulse width value. And this changes the sound as well, of course.
Go on the Pulsetable Pos entry, and write “01”. Then, press enter. You are now on the pulsetable. On entry 01, write “83 00”. It should be meant as “8 300”, despite the way it appears on the screen. “8” is a command meaning “I am setting pulse width”. “300” is the pulse width value, which I have set to my taste.
On entry 02, you may only write FF 00. But, if you try to ear the sound this way, you’ll realize that it sounds very static.
To add a “dynamic” feeling to the sound, you have to change the duty cycle while the sound is being played.
To do this, on entry 02 write “20 10”, and on entry 03 write “20 F0”. Now, write FF 02 on entry 04. “FF 02” means “go back to entry 02.
We have just created a loop, when the pulse width is always keeping changing within a given range of values. What do “20 10” and “20 F0” mean? The 20 on the left means “20 ticks”. Those are twenty ticks of an imaginary metronome. So, 20 ticks is a measure of a duration. The 10 on the right, is the increment of the duty cycle value. So, “20 10” simply means: “for the next 20 ticks of the metronome, increment the duty cycle value by 10 for each tick”.
And “20 F0”? It just means “for the next 20 ticks, decrement the duty cicle value by 10 for each tick”. “F0” just means -10, that’s why the value is decreased by 10 on each tick.
For increments, Goattracked uses some special numbers that can be either positive or negative, but with no sign. We are not going to talk about this, this is pure mathematics, not very interesting maybe. But, what you should know, is that you can obtain a negative number by pressing SHIFT+N while you are on the positive number with the cursor. So, to fill in entry 03, you can write 20 10, then press SHIFT + N while the cursor in still on the 10 on the right. It is easy, and it allows to quickly get the negative value of any number. To make it positive, just press SHIFT + N again if needed.
So, this is the duty cycle loop:
02 :  20 10
03 :  20 F0
04 :  FF 02
Now, it’s time to change the “hit” sound.

Set ADSR parameters like the picture above (decay goes from 5 to 9). Then, change the waveform. We will make use of more waveforms. Goattracker will change them very quickly while the sound is being reproduced, so that we will get a sophisticated enough sound.
As you can see, the wavetable for the hit is as follows: 81 DF, 41 9D, 41 9B, 40 99.
White noise is used for just a very short period of time. This is just a very short noise, like a hit. Then, the square waveform is used, each time with a different absolute value of the frequency. Different values help shaping the sound properly. Values are selected by taste and experience.
Please note that the last wavetable entry value is “40”. Well, this is a square wave, but the gate bit is off. That means: “go into the release phase immediately”. This must be done, otherwise the hit would sound strange, metallic. You can try replacing “40” with “41” to ear what will happen.
As for the pulsetable, we just need one value this time. On drums, we almost always need a duty cycle value of 800. Entry 05 of the pulsetable is set accordingly.
Let’s now improve the snaredrum or snare sound.
As you can see, we are using noise along with square wave. The wavetable values are 41 AC, 41 AC, 41 AA, 41 AA, 41 A8, 41 A8, 80 DF.
We are using absolute values for the frequency. The choice has been made to my taste. Please note that the white noise is used at the end of the wavetable, not at the beginning. That’s just the opposite of the hit.
You may try different values, for instance 41 AE for entry 08, and 41 AD for entry 09. This way, the snare should be stronger.
The pulse width (or duty cycle) is set to 800, like on the hit sound.
Now, we can change the lead sound. We will replace the old flute with something more appealing. It’s not a real instrument, we’ll use an imaginary lead instrument.
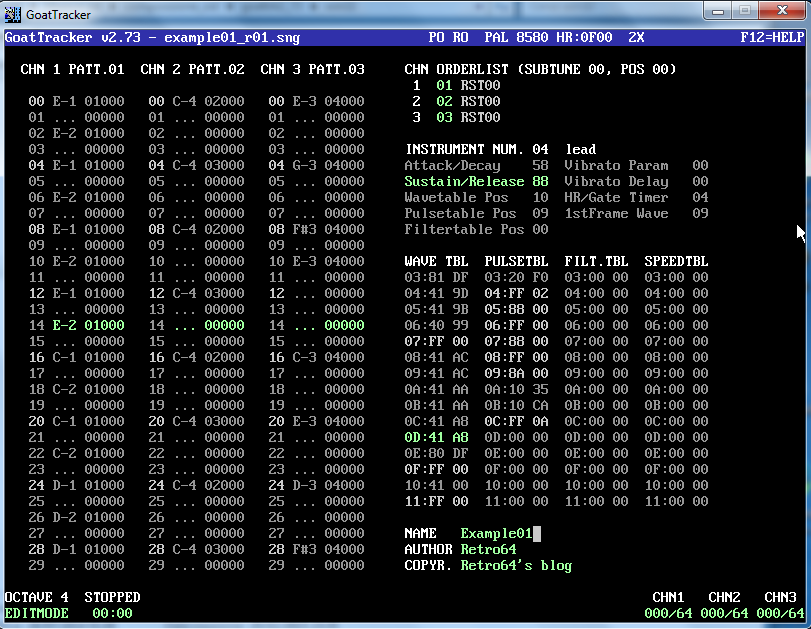
The instrument uses a “square” wave (pulse wave). Starting value for the duty cycle is A00 (on pulsetable entry 09). Note the loop for the duty cycle (pulsetable entries 09, 0A, 0B, 0C). Again, on entry 0B, we have a negative value (CA is the negative of 35).
Pulse wave is the most used for leads. Pulse width (duty cycle) may be changed dinamically in many different ways, so that you can shape the sound with freedom.
We can do many other modifications to our song.
As you can see, the bass line takes one channel, while drums take another channel. Now, we want those drums and bass on the same channel. So we have to put both the bass line and the “rhythm” line on a single track. There are two ways to do that.
One way, is to cut some notes on the bass line and replace them with the drums. That will provide intact drums, but the bass line will be sacrified a bit. To fit the “rhythm line” on the bass line, bass line notes on the 1st octave must be cut.
I have done this in two stages. On the first stage, I have replaced only some notes on track 1, just to fit the hits. See the file “example01_r02_01.sng”. While listening, you will hardly notice any difference I think. But some notes on the bass line are actually missing.
Then, on the second stage, I replaced the remaining bass line notes with the snares. See the file “example01_r02_02.sng”. Now you can ear a difference. The couple bassline + drums doesn’t sound as smooth as before but still, it works fine. The rhythm line is still intact. Strong drums are very useful in those situations. If they are strong, you will barely notice the missing notes on the bass line. If they are not strong enough, you may notice missing notes much more.
With bass and drums mixed, we gain a free channel. Now track 2 is empty, and we can add something else to our song. We may add arpeggios, or arps.
On SID music, arps are chords played on a single channel. With one channel, we can’t play more notes simultaneously. That is just impossible. But, we can play the notes that make up the chord very quickly, in a loop. This creates a sound very similar to an old ringtone. It is a weird sound, it feels like this at the beginning at least. But, it really helps to feel the harmony of a song. It helps to refine songs so much.
Now, I am not going to teach you harmony. I can’t just do that, I am not a musician. But I’ll just tell you my very basic understanding of chords and the way to link them together to obtain a strong structure.
Our very simple bassline is made up of three notes: E, C and D. We will choose the chords according to these notes.
There are many kinds of chords. Minor chords and major chords are enough at the moment.
Minor chords are “sad”. If you listen carefully to a minor chord, you will feel a bit sad. They express sadness, lack of hope. Major chords, on the other way, are “happy”. You will feel happy if you carefully listen to them. They express hope, happiness.
Usually, a song is a mix of minor and major chords. You may also have major chords only. To my experience, songs with minor chords only are less common.
According to the main melody, I have selected the chords: E minor, C major and D major. Chords will be played in sequence, and the chord being played will change according to the bass line. They must be synchronized somehow (it’s not a fixed rule actually, but let’s assume this for now).
Minor and major chords are built in a different way. That’s no surprise, they sound different. Please note that we don’t care which notes make up a chord. We just need a starting note, and we need to know how much the remaining notes are pitched higher than the starting note. In other words, we need to know how many semitones higher is the second note of the chord from the first one, and so on.
The starting note, is just the note on the track played with the arp instrument, as you will see from the example.
A semitone is the pitch/frequency difference between two notes, INCLUDING altered notes. So, a semitone is the difference from A and A#, and A# is just a semitone higher than A. A semitone is also the difference between B and C. In facts, there is no black key between B and C on a piano.
There are different ways to build chords, and we can use a variable number of notes. We will use three notes only. We will use the following rules:
- minor chords: start from the note with the same name as the chord. The second note, will be three semitones higher than the starting note. The third note, will be seven semitones higher than the starting note.
- major chords: start from the note with the same name as the chord. The second note, will be four semitones higher than the starting note. The third note, will be seven semitones higher than the starting note.
So, referring to the starting note, on a minor chord:
- the relative pitch of the first note is 0 (actually, it is the starting note);
- the relative pitch of the second note is 3 (three semitones more than the starting note);
- the relative pitch of the third note is 7 (seven semitones more than the starting note).
And, referring to the starting note, on a major chord:
- the relative pitch of the first note is 0 (actually, it is the starting note);
- the relative pitch of the second note is 4 (four semitones more than the starting note);
- the relative pitch of the third note is 7 (seven semitones more than the starting note).
On Goattracker, on wavetable entries, we can write the absolute pitch on the number to the right (like on drums, as we know). But, we can also write relative pitch there, just following the rules above.
So, the wavetable of a minor chord will be:
01:   41   00     (waveform for the chord)
02:   00   00     (first note is the same as the starting note)
03:   00   03     (second note is 3 semitones more)
04:   00   07     (third note is 7 semitones more)
05:   FF   02     (go to entry 02, play again the notes of the chord)
On each entry, the number on the left can be used for the waveform. The number on the right may be used for absolute or relative pitch (in this case, it is relative). Please note that if the number on the right is 00, it means “I will play the note I am currently finding in the track”.
The number on the left may be also used to express duration. Of course, it must be lower than 10, as it is used to refer to a triangular waveform with an off gatebit.
On the above example, each note of the arpeggio is played for a tick only. That’s too fast in 2x mode, you will ear a scratching sound. But, we can obtain a good sound by extending the duration of each note of the chord:
01:   41   00     (waveform for the chord)
02:   02   00     (first note is the same as the starting note)
03:   02   03     (second note is 3 semitones more)
04:   02   07     (third note is 7 semitones more)
05:   FF   02     (go to entry 02, play again the notes of the chord)
Load the file “example01_r03.sng” to listen to those arps. Look carefully at the wavetables to see how they have been made. You will find no more than the above rules.
Now the song is richer, much richer.
The orderlist is just made up of one pattern at the moment. We can add more patterns, and we can use only existing tracks for now. This way, we can expand our tune with little effort. Please refer to the file “example01_r04.sng”.
To add an entry on the order list, use the “INS” key. To delete it, use “CANC”.
Please note that on Goattracker, tracks are called patterns. Well, I use a different naming, matching other trackers. A pattern is not a track, it is a union of tracks.
Track 00 is an empty track. It is a mute track. The first entry on the track is:
----- 00600
The “—–” is obtained by pressing “Enter”. It means: go into the release phase. The numbers “600” are actually a command and its parameters. “6” means: set sustain/release parameters. It has priority over the parameters of the instrument being played. So, with the “—-” we go on release phase. Release is forced to 0 by the “6” command, so any instrument being played is instantly muted.
This is important, because the song is looped. We don’t want the sounds from the last pattern to be played at the beginning of the song. Try to delete the first entry of the mute track 00, and you will understand what I am talking about.
Now, load the file “example01_r05.sng”.
As you can see, I have created a new instrument (electric piano), and I have used it on a new track (track 04).
I have also introduced a “key change” in the song. You can see signed numbers in the orderlist.
It is possible to tune up all the notes of each track by a specified numbers of semitones. This is done by adding a +2 (or any other number) in front of a track in the orderlist. Just press “INS” in front of the track, then press +, and write the number.
Please note that a +0 is needed in front of the tracks of the first pattern. This is because we want the tune to be played with the “normal” notes when it starts again.
The keychange, done on this way, it’s very useful because it allows to vastly enrich a song “recycling” existing tracks. Of course, you can also use the keychange with new tracks.
Please note that absolute pitch/frequency values on the drums are left unchanged.
Another way to expand a song with little effort is by repeating a track. This is showed on file “example01_r06.sng”. Press ins before a track. While on the “00”, the “R” can be entered by pressing SHIFT+R. The number you will enter after the R is the number of times the track following the R command must be repeated.
Now, we have a song that uses all three channels in a efficient way. At least, for a beginner song.
But, is there a way to get back the full bassline without loosing anything we have now? The answer is yes: we need mixed instruments.
We can mix two instruments together. We need: an instrument that is hit at the very beginning, then it suddenly becomes a bass. And, likewise, an instrument that is a snare at the very beginning, then it suddenly becomes a bass.
We already have what we need, we just need to do some modifications to the drums.
Load the file “example01_r07.sng” to check this out.
The concept is as follows. The starting point is the wavetable of the drums. They will not end up with F00, but with F01. It means: go to the wavetable of the bass. So, the drum waveforms will be set, and then the waveform of the bass, for this instrument. Yes, you can use a wavetable of an existing instrument for a new one.
But, we now have to take care of the pulsetable also. On the pulsetable of the hit, we repeat the 800 value for a few times, then we have a F01 command. It just means: you have kept set the pulse value of the hit, now set the pulse value of the bass. How many times we have to repeat the 800 value on the pulsetable? Just according to how many absolute values we have on the wavetable for the drums.
So, to play a mixed instruments, we must change both wavetable and pulsetable for the drums, and those table must match together, so that while we are playing the absolute pitches of the drums, the pulse is 800, and when we are playing the bass, the pulse is just the one of the bass. So, we have a F01 command at the end of the pulsetable of the mixed instruments. It jumps to the duty cycle settings for the bass instrument.
To make things clearer, here are the wavetable and pulsetable of the mixed bass+hit instrument coupled together:
WAVETABLE      PULSETABLE
03:   81DF     05:   0800
04:   419D     06:   0800
05:   419D     07:   0800
06:   419B     08:   0800
07:   419B     09:   0800
08:   4199     0A:   0800
09:   4199     0B:   0800
0A:   FF01     0C:   FF01
As you can see, the pulse is set to 800 for the whole duration of the drum sound. Then, at the same time, the FF01 commands are issued, and they set bass waveform and pulse at the same time. From entries 0A of the wavetable and 0C of the pulsatable, it’s just the old bass instrument that is being played. And, to put things clearer, since on the 01 entry of the bass, we have “41 00”, the bass will be played with the note that is being found on the track.
On the mixed instrument, ADSR parameters are the same one as the bass instrument. They may be adjusted a bit to get a better sound for the mixed instrument.
Compared to the original wavetables of the drums, I have done some changes. These are needed to make the drums more audible. Of course, you should try to leave the bass line the stronger you can.
Now, load the file “example01_r08.sng”.
This is the final version of the song. I have added a couple of tracks to show the use of mixed instruments. As you will ear, at the beginning you only have the pure bassline. Then, some hits in sequence come up. Then, a snare adds. The bassline is actually being sacrified a bit to fit the mixed drums, but you shouldn’t notice it. You should ear the same bass line as before, just with drums being added. This is the illusion of different instruments played together on a single channel. This is the technique used by SID musician to cope with the three channels limit of this chip.
It was an amazing tutorial. I think otherwise it wouldn’t had been possible to me to break through the start up process.
And, last but not least, I love both melodies.
Thanks
Even better:
10 I=1
20 PRINT “Thanks ”
30 I = I + 1
40 IF I<=1000 GOTO 20
run
Hello! Thank you ever so much! Enjoy your C64! 🙂