On part one and part two, we have introduced some very basic concepts about Goattracker. Now, we are taking a step further on making Commodore 64 music with Goattracker with something a little more complex. On this tutorial we will try to create a remake of the title tune of Delta by Rob Hubbard.
Of course, the loader tune is obviously out of the question. It’s way too complex for a tutorial. Instead, something close enough to the title tune can be done with not too much effort.
We won’t be doing an exact remake. We won’t use advanced techniques but still, we will try to get the feeling of the original tune as much as we can.
After a few hours of work, here is the simple remake I have come up with for this tutorial. Both the .sng file for Goattracker and the .sid file for Sidplayer are available.
DOWNLOAD: Delta title tune by Retro64 (Goattracker tutorial)
Using your ears to “steal” notes
There’s nothing more suitable than your own ears to try and steal the notes from the original song you are going to cover or remake. If you have a music keyboard – even a very basic one – it will help.
The first thing to do is to “split” the tune on different parts. In particular, a great attention on what happens on each SID channel must be taken. An old version of Sidplay has a mixer that allows listening to a single channel.
On this tune, we have a channel entirely devoted to the bass line. Then, we have a channel with high-pitched sounds and drums. Finally, the remaining channel deals mostly with the main melody.
The bass line
This is something quite important in Rub Hubbard’s tunes. And this tune in particular features a quite catchy bass line. Its rhythm is not quite complex. We just have a sequence of notes with the same duration. But there are some “octave jumps” that make this bass line intriguing. And the bassline also has some very short melodies on it that are used to follow the harmonic structure of the tune. For instance, you may have noticed that at a certain point bass-line notes change so that they can accommodate for a tonality change.
But, let’s have a look at things from the very beginning.
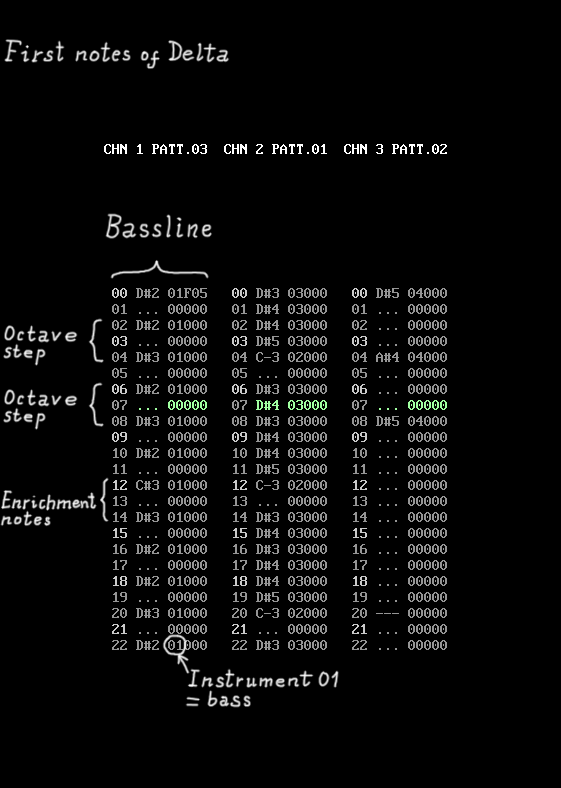
At the beginning, song tonality is D#. Some “octave steps” are performed, so that bass lines notes alternate from D#2 to D#3 for a while. On note entries 12 and 14 there are some “enrichment notes”. Those are “variations” used to enrich the bass line, but they confirm current tonality.
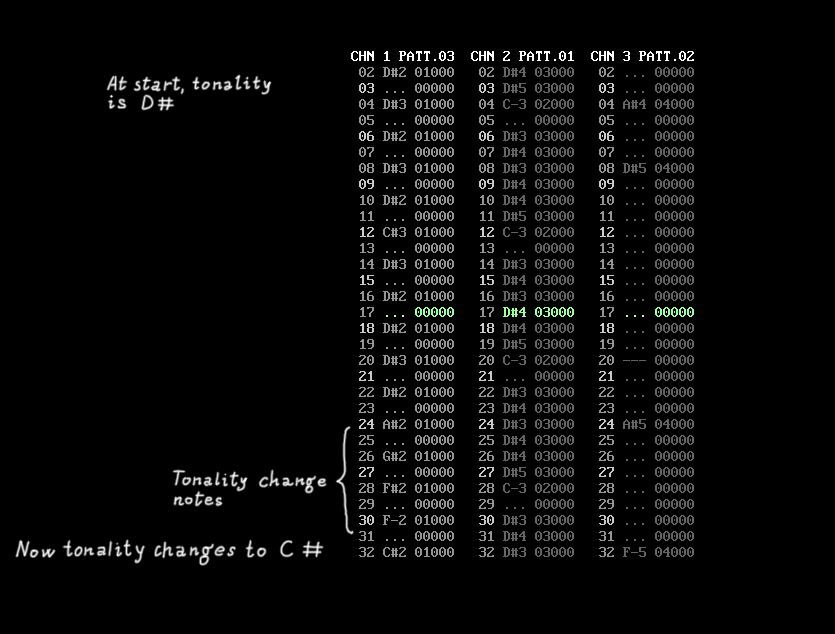
From note entry 16, the same bassline from the beginning repeats until note entry 23. From note entry 24 up to note entry 31 there are some “tonality change notes”. Those are used to make a transition from tonality D# to tonality C#. There are rules to select those notes… but I just use my ears. Listening to many SID tunes is what is really required to get the ability of successfully looking for “suitable” notes for basslines, melodies, arrangements and so on.
From note entry 32, tonality has changed to D#. From note entry 32 to 63, the structure is more or less the same as the one related to entries from 0 to 31.
This is the more or less the structure of the bassline for most of the song. Notes change according to the tonality of each measure. “Enrichment notes” and “tonality change” notes closely follow the main melody.
As a little review to Goattracker functions, let’s see how to listen to the bassline only.
Load the .sng file on Goattracker. Now, with the tabulator or mouse pointer go over a note entry on channel 2 track. Now, press SHIFT+F4. You will notice that notes on this track will get darker. Now, go on a note entry on channel 3. Press SHIFT+F4 again. This track will get darker as well.
Now, press SHIFT+F1. You can now listen to the bassline only with the ability of following the notes. Please take some time and carefully have a look at the many notes that are scrolling. While listening, try to sing the main melody on you mind (or with your voice, that’s your choice). You’ll see that bass notes will nicely get along with the melody you are thinking on your mind.
This process will be extremely helpful to understand why Rob Hubbard organized the bassline the way he did.
While listening to the bassline, you will also hear a short hit, repeating and repeating. This is a percussion mixed to the bass instrument. So, instrument 01 is a mixed instrument. We have already talked about mixed instruments in the second part of this tutorial but still, we will have a look at the instruments used on this song later.
The arrangement on channel 2
Here, starting from Hubbard’s idea, I did something a bit personal. You may like it or not, but the point is the main idea from Rob Hubbard is more or less intact. Differences from the original are dealing with a different instrument being used and with faster notes.
By looking at channel one, you may notice one thing. Those high-pitched notes does not follow the bassline but they rather insist on the same tonality from notes entry 0 to 63 (have a look at track 01). This is the very same approach used by Hubbard. There’s no mistake going on here – it’s a matter of style. After all, if track 01 would follow exactly the tonalities of the remaing parts, the song would have been more predictable.
On track 01, we have two instruments. Instrument 03 is used for high-pitched sounds, while instrument 02 is used for the snare sound. Although softer than the original snare, it uses the very same approach of alternating two different waveforms quickly (white noise and pulse wave on my remake).
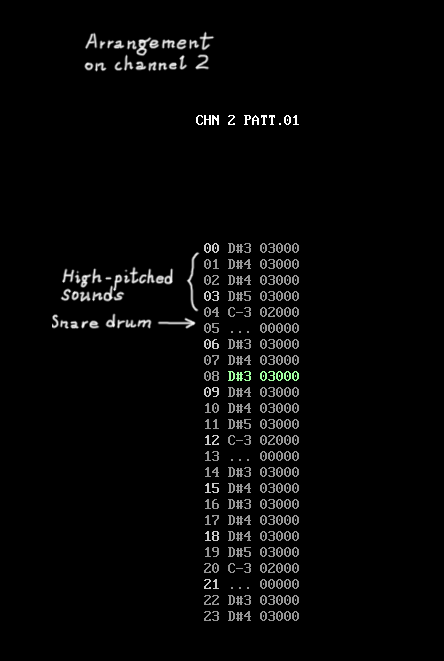
The snare is quite old-schoolish, but it is an improvement over the old white noise only snares. I think that the better snares from Rob Hubbard are those that can be found on Ace 2.
A really interesting part
Something quite interesting happens on both tracks 04 and 08, starting from note entry 32. You can see that the bassline is quite rich here, as four tonalities are used (F#, F, D# and A#). On channel 2, G# notes are used along with all four tonalities. Again, using F#, F, D# and A# notes on channel 2 too would have made this part too predictable. Furthermore, the use of G# notes on the second part of track 8 gives a sense of suspension. And while you are listening to this part, you are waiting for something that will bring back to you previous sensations. In fact, after this part a melody with the same tonality from the very beginning is back.
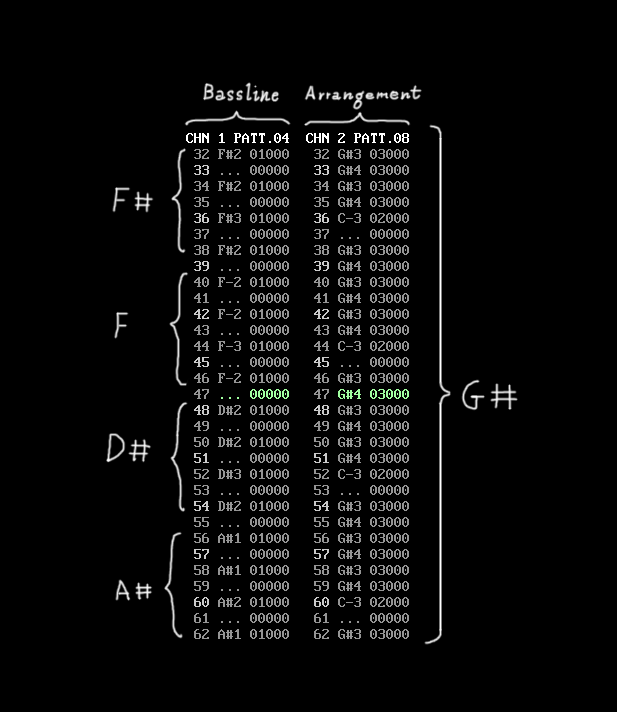
So, the varying, “dynamic” bassline on this part, coupled with the suspended, “static” channel 2 arrangement insisting on a mere G# note, provides some sort of nice effect. This technique is just telling us that a good style of composing requires that different things should happen on each channel. All channels must not always follow a rigid overall structure. But still, things must live together in harmony. So, it’s a matter of experience.
The main melody
The main melody is very catchy, yet it is fairly simple on the first 25 seconds. Then, it starts to go faster. The rhythm is nothing complex, all notes share the same duration (I am talking about tracks 06 and 07). Still, getting all the notes by ears may be not that easy, because notes are being played quite fast.
Playing the original tune at a very low speed may be of help on such cases. Once, I coded a simple BASIC player to play the Monty on the Run tune slowly. But, this time I used another approach.
Sidplayer2 allows you to save a SID tune on a PC format (for instance, .wav). Once you have that file, a PC program such as Audacity will allow you to play the tune slowly. It’s important to use a method that won’t affect intonation. This way, you will be able to guess the notes by ear.
This trick just saved my day, as I couldn’t get some notes right on tracks 06 and 07 in particular.
The remaining part of the melody was quite easy to figure out instead. Still, there were short “jingles” on the final part of the melody that needed some thinkering. Those “jingles” can be found on tracks 12 and 13 – I am referring to the notes played by instrument 06.
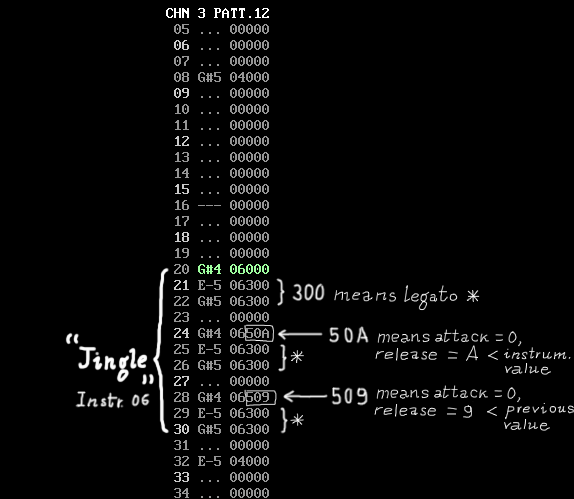
Since the “jingle” is fading in value, we need to use a command to set attack and decay to specific values, other than those in the instrument ADSR settings.
So, the command 50A near a note will set attack to 0 and decay to A, overriding instrument settings for that note.
The first three notes of the jingle are played using instrument parameters, so with a decay of D. The second three notes are played using custom decay value A. The last three notes are played using custom decay value 9. This results in three groups of notes played at a different volume level, resulting in a fading effect. Please note that volume cannot be set on each channel individually on the SID chip. Only global volume is possible. That’s why we are using ADSR settings.
A quick look at instruments
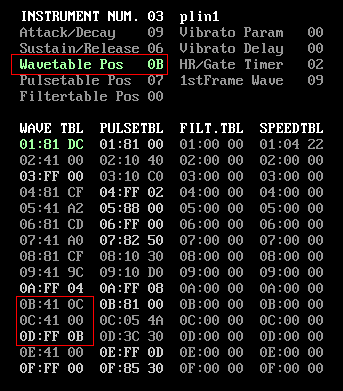
The bassline is played using a bass instrument (instrument 01). It is a mixed instrument, since it also has a very short hit sound for rhythm. You can see this from the wavetable (at position 01 in the instrument wave table). This technique allows for some sort of sound multiplexing. In fact, if you listen to the bassline alone (channel 1 only), you will also hear those short hits, like there was another channel.
Note the absolute value used for waveform $81 (noise). The absolute value for frequency is used so that the hit stays the same for all notes being played by the bass instrument.
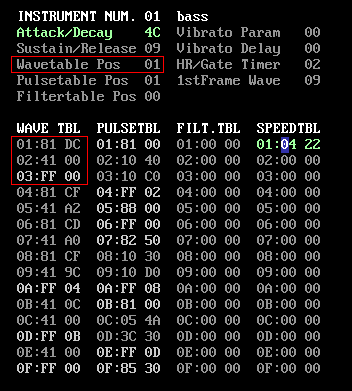
Please also note the pulse table. The pulse width keeps changing with speed so that you get that “nasty” feeling on the bass sound.
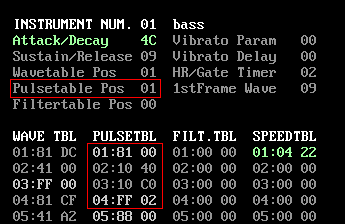
For the bass instrument, the pulse width starts from value $100. Then, it gets incremented by 40 on each tick, for 10 ticks, then it gets decremented by 40 (-40 is C0, use CTRL+N to negate a positive value) on each tick, for another 10 ticks. Now, the command FF02 restarts the cycle, making the pulse width value go up again (it means: go to position 02:, where you can find the command 10 40).
Instrument 02 is some sort of power snare. It alternates waveforms $81 (white noise) and $41 (pulse wave). Since a snare has no intonation, near the waveform values there are all absolute frequency values. So, despite the note used on the tracks for the snare, it will always sound the same.
The pulse width value is fixed ($800). This is a square wave, suitable for drums.
Instrument 03 is used for the arrangement on channel 2. It is a weird sound.
As you can see, the waveform is $41, but the instrument keeps cycling between two different relative frequency values. That means, on a tick,$0C half-tones will be added to the frequency of current note on the track, and on the following tick, the value 00 will be added (so, the note will stay the same as on the track).
When $0C half-tones are added to the track frequency for the note, the result is a note that is one octave up. So, instrument 02 has a “ringing” sound because of this quick, continuous octave jump.
Instrument 04 is the main lead, used to play the main melody. It makes use of a pulse wave. Let’s have a look at pulse width settings and vibrato parameters.
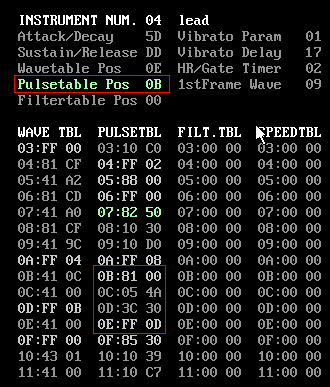
The pulse width starts from $100. For 5 ticks, it changes very quickly. Then, for 3C ticks it changes more slowly. 3C is a value big enough to properly suit the maximum duration of a note in the main melody. In facts, the pulse width modulation is not continuous here. If you keep a note being played for very long, you will hear a gap at a certain point. But, this is not a problem for this tune. Please note that once the pulse width increases beyond the maximum allowed value, it will just wrap around to the minimum value.
Vibrato has been set for this instrument, so that sound is richer. A vibrato delay has been set as well, so that the vibrato for a given note will not start instantly. This is good, as the pitch of a lead note won’t be changed at the very beginning. This is useful to the listener, as he or she can better get the notes from the melody. The vibrato only starts when the note has been already “understood” by the brain of the listener. It also depends on vibrato speed and depth, of course.

Please note that the value 17 doesn’t make reference to a table. It’s the actual delay value.
Instead, the vibrato parameter refers to a table:

On table 01, we have the values 02 and 42 hex. $02 is the speed, that is, how fast the frequency will change. $42 is the width, and it tells how much the frequency will change from the starting value.
Values can be accommodated to personal taste – it’s just a matter of trial and error.
Instruments 05 and 06 are quite similar, they only have different ADSR settings. Instrument 05 is used for the melody on tracks 0B and 0D. Instrument 06 is used for the “jingles” on tracks 12 and 13.
Let’s have a look at instrument 05.
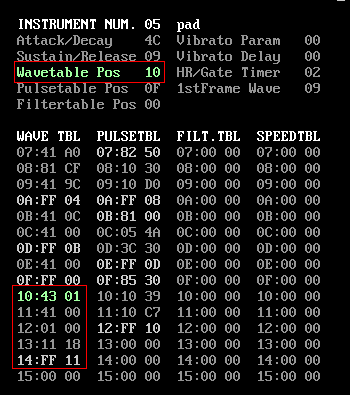
As you can see from the picture, this instrument has a “complex” waveform table. The values 43 01 on position 10 mean: use pulse wave with sync, and raise up current note by a half tone. The note gets detuned for a very short while, since on position 11 we get back to a 00 value for frequency, which means: leave note frequency as it is on the track. The values on position 10 provide for a “scratchy” sound at the very beginning of each note.
Furthermore, you can see that waveform keeps alternating between $41 and $11 (pulse wave and triangle wave). And, when the triangle waveform is selected, note frequency is also rised-up by two octaves ($18 = $0C + $0C). This makes some sort of high pitched sounds that mix together with the note being played when the waveform $41 is selected. This creates some sort of duo.
We are done… but that’s only the beginning of the fun
Now that you have a Goattracker version of the title tune of Delta, you can do many things with it.
For instance, you can change instrument parameters and get more advanced sounds. For instance, you can replace the very old-schoolish snare sound with a modern one. Or, you can apply a filter to the bass sound.
Another thing you might like to do is changing the melody. You could add legatos and portamentos for instance, or add a reverberation effect.
Or maybe, you don’t like my version of the arrangement on channel 2? In that case, you can change it, getting something closer to the original version or to your taste. It’s all up to you now. Have fun!
Hi,
Very nice tutorial but the downloaded package is corrupted and cannot be unzipped 🙁
Hi! Thanks for letting me know, I will have a look at the issue 🙂
I downloaded the archive and it can be extracted properly. By the way, you can contact me by using the contact page mail address, then I can send you the files via mail. Bye! 🙂