On a C64, drawing circles is quite difficult using BASIC V2, not only for speed problems, but also because a circle drawing algorithm is not that straightforward to figure out. A good circle algorithm can be found on Commodore Hacking Issue 9. Still, I am not going to use that technique. I am more interested on figuring out how to draw a good circle (e.g. a circle with no holes) by using plain math equations. And with no mirroring.
We have already talked about the technique of drawing circles (and ellipses) using sine and cosine functions (again, my sphere drawing program). But this time, we will use the equation of the circle (circumference to be exact), which is usually given in an implicit form (which basically means to us, it is not directly usable in a drawing program).
You may remember a program in the Programmer’s Reference Guide that draws a semicircle.
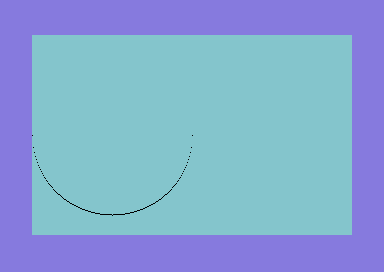
As you can see, the result is quite poor. Many points are missing, especially on certain parts of the semicircle. Also, we are more interested on an entire circle. And possibly, we would like to clear the bitmap screen before Christmas. Of course I am just trying to be a little funny, but there’s nothing wrong with the code actually, as the authors were just trying to provide readers with code as simple as possible. Furthermore, they clearly state that to handle bitmap graphics efficiently on a Commodore 64 you either need an utility or machine language programming.
But, since I have been wondering for quite a long time how to get rid of these “holes” (AKA discontinuity), I have lately made some efforts in order to improve the above program.
I have already mentioned an article by Commodore Hacking. Furthermore, there are loads of online tutorials talking about Bresenham algorithm variations for circles. Those algorithms use discrete math, thus they are capable of providing you with “hole-proof” circles. But still, I just want to get things working using exact/continuous math.
The program from the Commodore 64 Programmer’s Reference Guide and my experiments are available for download as a .d64 disk image. Those BASIC V2 programs are quite slow and are best run using an emulator in warp mode.
DOWNLOAD: Circles introduction
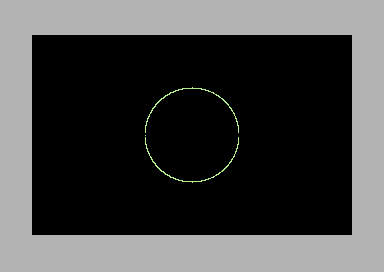
First of all, I have coded a simple program that draws an entire circle (“circle holes”). The program contains some additional code to handle the bitmap screen from BASIC V2, but the part we are more interested on consists of the following lines:
105 r=47
115 rs=r*r
125 forx=160-r to 160+r
130 t=sqr(rs-x*x+x*320-25600)
140 y1= t+100:xp=x:yp=y1:gosub42
145 y2=-t+100:yp=y2:gosub42
155 next x
The subroutine at line 42 is used to plot points on the bitmap screen. XP and YP are the plotting coordinates. So, assignments to these variables and the statement GOSUB 42 just mean PLOT.
The term t in line 130 is later used to write the explicit equation of a semicircle centered at 160,100 (the center of the Commodore 64 bitmap screen). To obtain an entire circle, two equations must be used (lines 140 and 145).
But, we are still stuck with discontinuity (we have holes). To fix the issue, we may add a STEP statement in line 125, so that X gets incremented of a quantity much smaller than one on each loop.
Sadly, we don’t got that far with this simple idea. The program becomes slower and slower, and we still have some discontinuity. And to make things even worse, the circle is becoming “bold”. We still have holes, and we also have too many points where the circle has no discontinuity.

While coding my early line drawing routines (using math equations), I did notice that the function Y = F(X) would not work always. For some slopes, I had to take the function X = F(Y) instead. And dealing with circles, the concept is quite similar.
The implicit equation of a circle (circumference) is:
(X-X0)^2+(Y-Y0)^2=R^2
Where X0 and Y0 are the centerpoint’s coordinates.
We can get four functions from this equation:
1. X = F(Y) functions

X = -(SQR(R^2-Y^2+2*Y0*Y -Y0^2) - X0)

X = SQR(R^2-Y^2+2*Y0*Y -Y0^2) + X0


2. Y = F(X) functions

Y = -(SQR(R^2-X^2+2*X0*X-X0^2) - Y0)

Y = SQR(R^2-X^2+2*X0*X-X0^2) + Y0
To get a continuous circle, we must use formulas of type 1 on one half of the circle, and formulas of type 2 in the other half, according to the following picture.
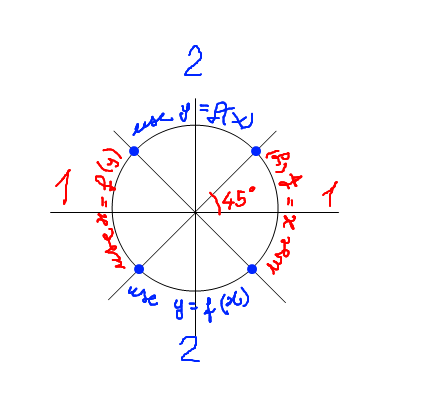
Now, the blue points set the limits when type 1 and type 2 formulas will work. Since lines intersecting the circumference have a known slope (45 degrees or pi/4 radians), those points can be found quite easily.
The program “circle allpts” draws a perfectly continuous circle by using the above techniques.
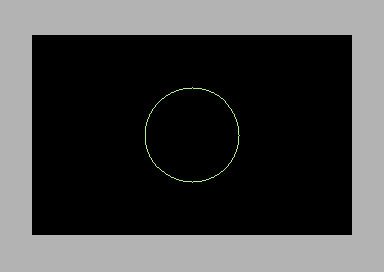
The most important part of the code is as follows (lines 105-215):
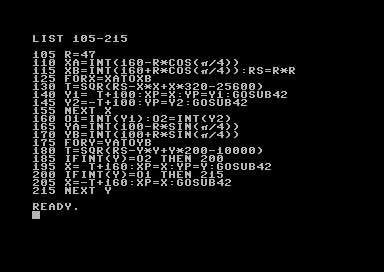
On lines 110 and 115, the two distinct x coordinates of the blue points are calculated, using simple trigonometry. Those are used to build up the domain of the functions Y1(X) and Y2(X).
Then, on lines 165 and 170, two distinct y coordinates of the blue points are calculated. Similarly, these are used to build up the domain of the functions X1(Y) and X2(Y).
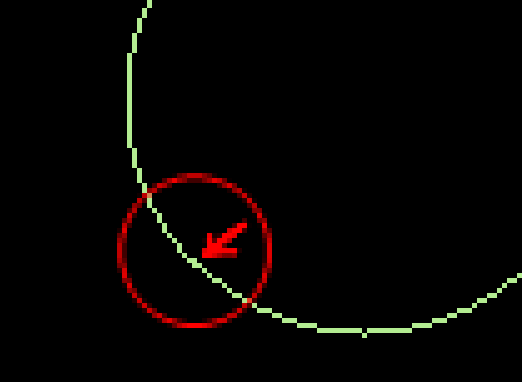
On line 160, values O1 and O2 are stored, so that they can be used for tests on lines 185 and 200. These tests are needed so that some unwanted points are not plotted near the blue points.
Otherwise, we would have an unwanted plot where a point has been actually already been plotted:
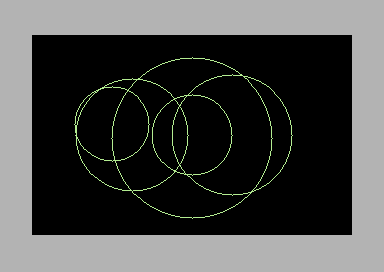
I have tested this routine by drawing several circles sharing the same center point (program “circles”). Again, warp mode is really needed here.

The program “circle draw” allows to draw one or more circles by choosing the center point. The program should check whether a circle fits or not on the screen, reporting an error condition during data entering, hopefully preventing the program to crash while drawing.
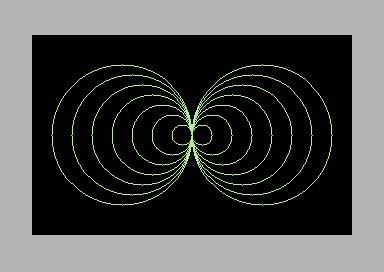
Finally, I have tested this circle drawing routine with the program “circles cps”.
So, it seems that we can get continuous circles even with simple equations from high school. As for speed, machine language implementation is what we need. We need a routine to compute the square root of a number, and as usual some integer math trickery. Maybe I’ll try this one day. However, we only need to calculate 1/8 of a circle, than we can mirror the other points. So, the above programs can go a bit faster if we add mirroring. Still, I have coded unmirrored versions to fully test this algorithm.
Two Simons’ BASIC versions of the program “circles” are also available:
DOWNLOAD: circles (Simons’ BASIC)
The first version is very similar to the BASIC V2 counterpart. It’s a bit faster, and the code is much easier to read.
The second version instead uses different, simpler formulas to get the coordinates of “blue” points (that is, the points that set the limits for the different functions to be used). Those formulas do not need trigonometry, so trig tables would not be required in a machine language version. These formulas have been derived using derivatives (given a curve, its derivative on a point represents the slope of the tangent line on that point). The blue points are just points where the tangent lines to the circumference have a 45 degrees slope.
For those who like math, further explanations of math concepts involved are available in the “math for programming” section of this blog (please click here if interested).
NOTE: Simons’ BASIC does provide a CIRCLE command. You may try to use it as well, and make some comparisons on how circles look with Simons’ BASIC routines and the ones presented here.
Complimenti innanzitutto per il tuo lavoro e per la voglia di mantenere viva questa fantastica macchina! Avevo 8 anni quando uscì il C64 e grazie ad esso sono diventato IT. Comunque, ho scritto una routine, in assembly, per gestire la “grafica” in 80×50. Per ora ho messo su il plotaggio di un punto e la possibilità di tracciare una linea. Avrei intenzione di inserire una routine per il disegno di un cerchio utilizzando i tuoi algoritmi. Ovviamente in assembly. Si può fare? Interessa? Vorresti pubblicare il mio lavoro in Assembly? Grazie.
Ciao, sono contento che ti piaccia il mio blog e ti ringrazio. E sono anche contento della tua testimonianza, perché il C64 ha dato una professione a tantissimi appassionati (anche se non è il mio caso, per me l’informatica è sempre stata soltanto un hobby). Un’implementazione in assembly del mio algoritmo per le circonferenze è sicuramente possibile, era nella mia to-do list ma il tempo è tiranno. Mi farebbe davvero piacere vedere l’implementazione e sì, sarei ben lieto di pubblicarla. Ciao e buon divertimento con il Commodore 64!