On earlier posts we have seen how to play a single note and how to play a one voice tune with BASIC. Now, we are going a step further – as we will be playing a simple three voices tune.
I can do SID music with trackers, but playing a simple three voices tune with code has been on my to-do list for a huge amount of time. I remember that back then I had a look at the three voices program on the Commodore 64 Programmer’s Reference Guide. To me, it wasn’t of great help. To be honest, I couldn’t even get the listing working.
Some days ago, I decided that I had to pay this “debt” to the past, so I started coding my very first three voices BASIC tune using my own ideas.
Although my program was more or less working, I wasn’t that excited. The program was long, and the tune did not enjoy a perfectly constant speed during execution.
So, I decided to look for something that was actually working. Then, I would adapt it to suit my needs.
A simple yet elegant BASIC music routine from Jim Butterfield
While looking for a good BASIC music routine, a little catchy tune popped-up on my mind. It is the music “Yankee Doodle”. A simple BASIC program by Jim Butterfield performs this tune on the Commodore 64. The program was released by Commodore on 1541 demo disks, so it was widely available (file program “M4 YANKEE” on German 1541 test/demo disks).
DOWNLOAD: M4 YANKEE (Jim Butterfield, 1982)
This little program may be regarded as one of the simplest and shortest three-voices Commodore 64 music routines.
A look inside Jim Butterfield’s music code
The program is easy to understand, elegant and efficient – no wonder, it’s a Jim Butterfield program.
SID registers are referred to in a clever way. Instead of using a single base address, three base addresses are used, one for each voice:
110 l1=54272:l2=54279:l3=54286
Those base addresses will be used to hold the low byte of note frequency for each voice.
Once those numbers are assigned to variables, it’s pretty easy to create variables for high byte frequency and waveform registers:
120 h1=l1+1:h2=l2+1:h3=l3+1
130 v1=l1+4:v2=l2+4:v3=l3+4
H1, H2, H3 will hold the frequency high byte for voice 1, 2 and 3. V1, V2 and V3 will hold the waveform for voice 1, 2 and 3.
Registers are referred to in the usual form BASE ADDRESS + OFFSET. One thing is important to note however. Using three separate base addresses, you have very few offsets to remember. For instance, by just remembering one offset – 4 – you are able to set the waveform for each voice. V1, V2 and V3 are all defined from L1, L2 and L3 using the very same offset 4.
When using the traditional base address S = 54272, in order to set the waveforms for all voices three different offset values are needed instead (S+4, S+11, S+18). Something which is harder to remember than just a single offset value.
On lines from 150 to 170, ADSR parameters are set for all voices. Again, using the above technique, the very same offsets can be used for all voices.
We will talk about line 180 later.
Now, line 200 turns off the gatebit for all voices. That means, release the key of all three instruments.
Line 210 reads the tempo. This is the common duration of all three notes that are being played on all channels on a given moment. It is a small value. It equals 20 jiffies on this song (1 jiffy = 1/60 of a second). This value can be changed on each measure if needed, allowing for a good degree of flexibility on notes duration.
Line 200 reads the frequencies for voice 1, 2 and 3. Since we need high bytes and low bytes, six numbers are read.
Lines 230, 240 and 250 take care of setting the frequency for each voice ONLY IF the high byte of the frequency of that voice is NOT zero. If a note from music data has a frequency of 0, it is just a pause – so we must not set the frequency value.
If the frequency value is different than zero, the gate bit is also set so that once the frequency has been poked on registers, the musical note can be actually played.
So, notes have a fixed duration, but pauses are variable. For instance, if on channel 1 (or voice 1, it’s the same) you have one note followed by three zero values, you know that you have three pauses after that note. In a sense, the note will last for four tempos – but the note sound will not last more than one tempo – 20 jiffies in this tune.
So, this routine is only for “pizzicatos”. You won’t be able to use instruments like organs or trumpets with this program. But this limitation is compensated by the simplicity and compactness of this marvellous minimal code.
Line 280 makes it possible to read the next three notes. So we have a loop between lines 200 and 280. This loop is exited when the tempo S is 0 (line 210). At this point, the tune stops. Line 700 contains a zero value for S, which is signalling the end of the song.
Timing
The program uses the system variable TI to handle timing. TI holds current time in jiffies (1 jiffy = 1/60 of a second). Line 180 assigns the current value of TI to the variable T, outside the music playing loop (lines 200 – 280).
Then, on line 260, T is incremented by S – which is the tempo. The system variable T is kept updated by the system – its value will become greater and greater. When this value is bigger than T, the loop on line 270 is exited, and other three notes can be read.
This approach makes sure that each iteration of the music playing loop will last no longer and no shorter than S jiffies. Since lines 230, 240 and 250 take a variable workload, depending on how many notes and/or pauses are read – line 270 sets up a variable pause that compensates for it.
In a nutshell, after lines 230, 240 and 250 have been executed, the value of TI may be more or less close to T. The closer it is, the shorter the pause performed by line 270 will be.
All of this assures that despite the code from line 230 to line 250 may require an unpredictable execution time, the tune will be played at a constant speed. The only assumption is that the time needed to run lines 230, 240 and 250 is always less than S jiffies. This is assured by the compactness of the code.
Note: on lines 230, 240 and 250, the code “IF X1 THEN” means: IF X1 <> 0 THEN. This “strange” form allows for a faster execution of IF statements.
Some modifications
Although the routine is quite… let’s say… sound, there are a few things that can be improved.
For instance, we can add the ability of playing notes for more than the duration S. That means, we can add the ability of keeping a piano key depressed even on the following tempos. That would allow us to use instruments like organs or trumpets – that is, instruments with a SUSTAIN parameter other than 0.
We must also note one thing. The system variable TI starts from 0 when the Commodore 64 is turned on, then keeps growing continuously. Theoretically that’s not a problem – since the above program only senses the difference from TI and T. T keeps growing too, due to the program (line 260).
Now, at a certain point TI and T will be bigger numbers. Handling big real numbers usually asks for more time than small numbers for BASIC. As a result, the BASIC interpreter may at times potentially fail to be fast enough for the routine, resulting in an incorrect speed of execution of the tune. However, the original routine works perfectly anyway. But if we add more features to it – for instance, adding sustain like explained earlier – then, we may run into timing issues. The more features we add, the more workload the music playing loop will take, resulting in more risk of going out of synch.
Since I wanted to play a fast tune, I had to come up with an improvement over this.
How to reset system variable TI
TI cannot be set to zero directly. It is not directly accessible, and any attempt to modify it will result in a SYNTAX ERROR.
The variable TI$, instead, can be assigned any time figure. The good thing is that when we reset TI$, TI is automatically reset by the system as well. So, an instruction such as:
TI$="000000"
will also set TI to 0.
So, we can reset TI and T at the beginning of each iteration of the music playing loop. This way, both variables will always have a small value, with no risk for the BASIC interpreter to slow down.
Handling musical data
Usually BASIC music routines of any complexity (like those involved with three-voices tunes) require some time to process musical data before actually starting playing the tune. Instead, the program by Jim Butterfield starts to play the tune instantly.
Each DATA line contains seven values. The first value is the tempo. Other values are note frequencies for voice 1, 2 and 3. This arrangement makes it possible to read the notes from DATA statements while the tune is being played.
If we had a block of DATA statements for voice 1, a block for voice 2 and a block for voice 3, we just couldn’t READ notes while playing the tune. This is due to the fact that random access to values on DATA statements is not possible. That’s why most BASIC musical programs require some time before actually playing the tune. On setup, they create an array from DATA statements, so that at a later moment the play routine can get random access to the notes from the array. So, even if we have separate blocks for each voice on DATA statements, the play routine can get separate notes from voice 1, 2 and 3 each time from the array.
However, entering notes on DATA statements using the approach in the routine by Mr. Butterfield is not that easy, as notes are scattered. For example, it’s not very easy to change the melody for a given voice, since notes for all voices are mixed together. Having a sequence of notes for each voice makes things much easier instead.
So, I decided to change the way notes are arranged on DATA statements. That asks to wait some seconds before the tune can be played, but creating and editing musical data is much, much easier.
My program
Based on the routines by Mr. Butterfield, here’s the program I have come up with:
DOWNLOAD: three voices tune with Commodore 64 BASIC
As you can see, there are three DATA blocks in the program, one for each voice. Values -1, -1 are used to signal the end of each block.
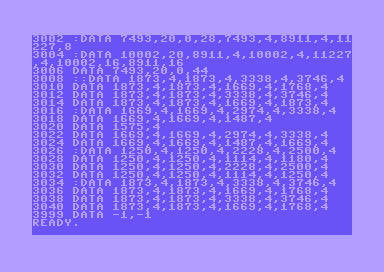
The block from line 1000 is for voice 1 and contains the bass line. The block from line 2000 contains the drums, while the block from line 3000 contains the main melody.
As you may have realized, this tune is a tiny “cover” of a small part of the tune “Monty on the Run” by Rob Hubbard.
On each DATA statements, each note is given in the format:
SID frequency 16 bit value, duration
Duration is a number from 4 upwards. 4 has been set as the minimum duration in the program.
The first part of the program creates an array that can then be used by the player routine to play the notes.
Let’s take a look at a small part of this array, and let’s make a comparison between associated DATA statements.

On line 3000, we have an A note with a duration of 20 time units. Then, we have a pause with a duration of 28 time units
On the array, we have the values 29 and 69 at the beginning. This is just an A note in the high byte – low byte format.
-2 is used by the modified music routine as a flag meaning that the previous note must be kept playing. We have a couple of values for each tempo, so we have a total of 4 “-2 signals”. Each “signal” has a duration of four time units. And since 4 time units are also taken when the frequency value of A is read, we have a total of five times of 4 time units, which means 4 * 5 = 20 time units in total. That’s just the duration of A from the DATA statements.
On the DATA statement we also have a pause of 28 time units. In facts, we have 14 zeroes following the last -2 value.
So, durations are divided in steps of 4 time units on the array, and the music playing loop only takes care of what happens on this very short time on each iteration. It just doesn’t care about the total duration of each note or pause.
To understand the modified play routine, let’s have a look at line 230:
230 ifx1>-2 then pokev1,w1:if x1 > 0 then poke h1,x1:poke l1,y1:poke v1,w1+1
If X1 is bigger than -2 (we don’t have to keep the previous note), the gate bit of current voice is set to off. Then, if X1 is bigger than 0 (that is, is not a pause), the new frequency value is put on frequency registers and the gate bit is set to on.
Even if we have a new note, setting the gate bit to 0 before playing the note is necessary. This way, two subsequent notes have a short pause between them. As we are not using legato, this just suits our needs.
If X1 equals -2, line 230 does just nothing. That’s correct, as we just have to leave the previous note playing.
The music playing loop is now from line 200 to line 280. On line 200, TI is always reset (by resetting TI$), so that TI will never be too big. On lines 278 and 279, the very same timing technique of the original program is used.
Line 215 takes notes frequencies from the array F%. The counter CN is used as an index (this is updated at the end of each iteration by line 278). The second index is used on F% to select the required SID voice.
The code from line 10 to line 70 is used to convert DATA statements on the array F%. On each couple of subsequent array elements, this routine either puts a 0 or high byte and low bytes of frequency depending on the value of the 16 bit SID frequency on DATA statements. If we have a 0 (meaning a pause), this value is then repeated on the array a number of times which depends on the duration value on DATA statements. If there is a duration value of 4, it is not repeated, since it is the minimum duration. Similarly, if we have a value different than 0, then, depending on the duration on DATA statements, the value -2 is repeated on the array, meaning that the note must be kept playing for a certain time. Again, if there is a duration of 4, it is not repeated.
Some final thoughts
With these modifications, editing notes on DATA statements is fairly easy, so you can delete DATA lines and replace them with the ones of your own tune. 16 bit values for the SID frequencies can be found on the Commodore 64 User’s Guide. I did not use international notation (e.g., letters for notes) because set up time for the program would increase noticeably.
If you want to play the tune again, don’t type RUN. Once you’ve run the program once, you can just type GOTO 100 to hear the tune again. That saves you the wait for musical data processing.
If you are using VICE, you can just RUN the program in warp mode. Once you get a READY prompt, you can exit warp mode and type GOTO 100 to hear the tune.
We no more have instant tune playing, but apart from easier DATA statements writing and modifying, we also have another advantage. DATA statements take less space, so for large tunes we can have a smaller program on disk or tape.
So, with a reasonable effort and by expanding a widely available program, getting a fast playing tune on Commodore 64 BASIC has been possible, even if I am not specialized on music routines. By the way, such experiments make you appreciate Goattracker even more : )
I’m not entirely convinced that the “Using Multiple Voices” program in the C64 Programmer’s Reference actually works. I’ve looked at two different copies of that program and double checked the DATA statements and the harmony seems to go off track and the higher voices drop out one after the other. I’m now determined to figure out what it’s actually supposed to sound like.
I remember that back in the days I had problems too with that. I actually got the very same problem you got. I somewhere found a working version, it sounds like an ancient song. Hope I can find it again and post here. 🙂
I’ve been composing some very minimal C64 BASIC sound works that are recreations of the types of sounds I used to program in my youth. I’ve been searching all over the place, and down many wrong rabbit holes, trying to figure out how to take my BASIC programs and turn it into SID files for easier sharing with others. I just cannot seem to find simple clear instructions anywhere on how to do that. Any suggestions?